A leaking septic pipe might start as a damp patch in the yard or a faint sewer smell near your home, but it can escalate into a full-blown health hazard if left unchecked.
Detecting a leaking septic tank is critical for preventing environmental damage and costly repairs. But how do you know if your septic tank is leaking?
Common signs include soggy ground, cracked joints, root invasion, foul odors, and plumbing backups, all classic signs of a septic tank problem that indicate it’s time for immediate inspection.
Early detection through regular inspection and monitoring helps maintain system health and avoid contamination.
This guide will help you spot septic pipe leaks early, understand their causes, and know when it’s a minor DIY fix or a job for the pros.
You’ll also learn how to detect leaks, pinpoint the source, choose the right repair, and prevent future issues. Therefore, let’s get started!
Top Causes of Leaking Septic Pipe

Here are the primary factors that can compromise your septic system:
1. Soil Movement
Natural ground movements due to erosion, earthquakes, or settling can cause septic pipes to crack or disconnect.
Such shifts place stress on the pipe joints and connections, eventually leading to leaks or, in some cases, a septic tank percolation problem that affects how wastewater is absorbed into the soil.
2. Tree Root Intrusion
Tree roots naturally grow toward sources of moisture, which makes septic pipes an attractive target.
They can penetrate small cracks or joints in the pipes, gradually expanding inside and causing blockages or breaks.
Root intrusion not only leads to leaks but can also cause wastewater backups and system failure if untreated.
3. Crushed or Damaged Pipes
Heavy machinery, vehicles, or accidental digging can crush or crack pipes. It creates openings for leaks.
Once damaged, wastewater can seep into the surrounding soil. As a result, it contaminates your yard and groundwater.
4. Insufficient Maintenance
Failing to schedule regular septic tank inspections and pumping allows solids to build up inside the tank.
This buildup increases pressure on the pipes and can cause sludge to clog or erode the pipes over time.
5. Clogs in the Septic System
Clogs caused by grease buildup, flushing inappropriate materials, or root intrusion can create blockages that increase pressure in the pipes. This excess pressure weakens the pipes and can cause leaks, cracks, or even pipe bursts.
To help prevent blockages from grease buildup, consider using a septic-safe enzyme cleaner like Cleaner Friendly Bacteria Booster. This product naturally breaks down organic matter without damaging your pipes or septic system.
6. High Water Pressure
Excessive water use from appliances, toilets, or irrigation can overload the septic system.
This high volume causes stress on pipes and the tank. It leads to leaks, especially in older or compromised pipes.
7. Excessive Use of Cleaning Products
Overusing harsh cleaning chemicals like bleach, antibacterial soaps, or drain cleaners can disrupt the delicate balance of bacteria inside the septic tank. These bacteria are essential for breaking down waste. When harmed, the system’s efficiency decreases.
To protect your septic system while keeping your home clean, use an enzyme-based additive like Rid-X Septic Treatment to maintain healthy bacterial activity. Ultimately, this prevents clogs and reduces pressure on the pipes, helping avoid cracks or leaks.
8. Freezing and Thawing Cycles
In colder regions, freeze-thaw cycles cause the soil around septic pipes to expand and contract.
This movement exerts pressure on pipes and joints. As a result, it causes fractures or breaks, especially in older systems.
9. Damaged Baffle
Baffles inside the septic tank regulate the flow of wastewater and ensure solids settle while liquids exit properly.
If a baffle is cracked or missing, it causes improper flow and uneven pressure on pipes. Ultimately, it increases the risk of leaks and backups.
10. Old Age and Wear
Septic pipes made from PVC, ABS, or older materials degrade naturally over time due to exposure to chemicals, soil conditions, and normal wear.
Aging pipes become brittle, crack easily, and are more tend to leaks.
11. Damaged Plumbing
Issues within the home’s internal plumbing, such as broken, cracked, or misaligned pipes, can cause leaks that negatively affect the septic system.
Indoor water leaks force extra water into the septic tank, which puts stress on the system and pipes. As a result, sometimes result in a slow leak into the septic tank that goes unnoticed until serious issues arise.
12. Improper Slope or Installation
Septic pipes must be installed with a proper slope to ensure wastewater flows efficiently to the tank and drain field.
Pipes laid too flat or too steep cause drainage problems. This leads to backups and extra pressure on joints.
13. Heavy Equipment Pressure Above Pipes
Driving or parking heavy vehicles or equipment over septic system components compresses the soil and stresses the underground pipes.
High pressure cracks pipes, collapses them, or pulls joints apart. This causes leaks and failure.
14. Seal Failure at Wall Penetration
The point where the septic pipe exits the home is sealed to prevent leaks and water intrusion.
Over time, these seals can degrade due to moisture, temperature changes, or poor installation. Failed seals allow wastewater to leak near your home’s foundation.
how do you know if your septic tank is leaking?

These indicators can appear both inside and outside your home, signaling potential leaks or system failures:
Inside the Home
1. Slow Draining Fixtures
Bathtubs, showers, and sinks that drain slowly can signal a blockage or leak. It prevents proper wastewater flow.
2. Gurgling Sounds in Plumbing
Unusual gurgling noises from drains or toilets often indicate trapped air caused by blockages or pipe leaks in the septic system.
3. Sewer Odor in Basement or Bathroom
Persistent foul sewage smells indoors often mean gases are escaping through cracks or leaks in the septic pipe.
4. Water Stains or Damp Walls
Moisture or water stains on basement walls near where the septic pipe exits suggest leaking wastewater that may also cause mold growth.
5. Water and Sewage Backing Up
Wastewater from toilets, drains, and sinks backing up into your home is a strong indicator of a clogged or leaking septic line.
Outside the Home
1. Standing Water Without Rain
Pools of water near the septic tank or along the pipeline during dry weather usually indicate underground leaks.
2. Soggy or Spongy Ground
Soft, wet patches of soil or grass above the septic pipe or drainfield often mean sewage is leaking into the surrounding earth instead of being properly contained.
3. Unusual Rodent or Insect Activity
Increased pests near the septic area may be attracted by leaking wastewater and damp conditions.
4. Standing Water or Damp Spots Near Septic Tank or Drainfield
These wet areas are classic signs that wastewater is escaping due to pipe leaks or drainfield issues.
5. Bad Odors Around Tank or Drainfield
Foul smells near the septic tank or drainfield are caused by escaping sewage from leaks or system failure.
How to Fix a Leaking Septic Pipe?
Here’s a thorough guide to help you address septic pipe leaks effectively.
DIY Solutions for Minor Leaks
If the leak is small or you need a temporary fix while arranging professional help, try these common DIY methods.
1. Seal Wall Penetrations with Hydraulic Cement
For leaks where the pipe passes through concrete walls or floors, hydraulic cement provides a durable, water-resistant seal to stop seepage.
2. Apply Epoxy Putty or Repair Sticks
Mix epoxy putty and apply it directly over cracks or holes. It hardens quickly and forms a strong seal.
3. Use Plumber’s Tape or Thread Sealant
Wrap plumber’s tape around leaking threaded joints or apply thread sealant paste to create a waterproof barrier.
4. Install Pipe Repair Clamps or Sleeves
Clamp-style repair kits can stop leaks by encasing the damaged pipe section, ideal for quick, non-invasive fixes.
5. Replace Cracked Joints with Couplings and Pipe Cement
If a joint is cracked or leaking, cut out the damaged section and join new pipe pieces using couplings and ABS/PVC cement.
6. Clear Clogs to Relieve Pressure
Sometimes leaks develop because clogged pipes cause pressure buildup. Use drain snakes or professional-grade cleaners to clear blockages.
7. Wrap with Rubber Sheeting or Self-Fusing Silicone Tape
Secure rubber sheeting or silicone tape tightly around the damaged section. These provide flexible, temporary waterproof sealing.
More Permanent Repairs
For larger leaks or damaged pipes, a longer-lasting fix is necessary.
1. Reslope the Septic Line
Incorrect pipe slope can cause backups and leaks. Regulating the pipeline ensures proper flow and prevents future leaks.
2. Excavate and Replace Damaged Pipes
Digging out and replacing broken or crushed pipe sections ensures a thorough repair, especially for PVC or ABS pipes.
3. Root Removal and Barriers
If tree roots invade and damage your pipes, professional root removal followed by the installation of root barriers can protect your septic line.
4. Use Camera-Assisted Diagnostics
Professionals often use specialized cameras to locate leaks, breaks, or clogs deep within pipes, ensuring precise repair.
5. Repair Concrete Pipes with Mortar or Hydraulic Cement
Concrete pipes require mortar to fill cracks and restore structural integrity, often paired with hydraulic cement for waterproofing.
6. Relining the Pipes
Some companies offer pipe relining, where a flexible epoxy liner is inserted inside the existing pipe.
Cost to Repair a Leaking Septic Pipe
Below is a comprehensive table outlining the estimated costs for various repair scenarios.
1. Minor Joint Seal ($150 – $300)
This involves sealing small leaks in joints using epoxy or hydraulic cement. It’s a quick, non-invasive fix when the issue is limited.
2. Short Pipe Section Replacement ($300 – $1,200)
If a specific pipe section has damage, professionals can replace just that part. This includes both materials and labor.
3. Hidden Leak Diagnostics ($150 – $500)
Camera inspections and leak detection help locate the exact problem before digging. It’s a smart first step to avoid unnecessary repairs.
4. Major Underground Excavation ($2,000 – $5,000+)
For serious damage deep underground, excavation might be necessary. This is more labor-intensive and significantly costlier.
5. Pipe Bursting ($60 – $200 per foot)
Another trenchless method that involves breaking apart the old pipe while pulling in a new one behind it.
6. Pipe Lining ($80 – $250 per foot)
A trenchless repair option where a liner is inserted into the old pipe. It creates a new pipe inside the damaged one, without major digging.
7. Full Pipe Replacement ($3,000 – $20,000+)
When the whole system is beyond repair, full replacement is the only solution. Costs vary based on site, length, and pipe depth.
How to Confirm a Septic Pipe Leak?
Here are some checking factors you need to be careful about the leakage of the septic pipe.
1. Visual Inspection and Odor Detection
Begin by examining areas around your septic system for visible signs of leakage.
If you notice wet or soggy ground around your septic tank or drain field, even during dry weather, it could signal a leak or drainage issue.
Another common indicator is unusually lush or fast-growing vegetation in specific areas, as leaking effluent can act like fertilizer.
Persistent unpleasant odors, especially those resembling sewage, around your yard or near the tank are also a strong warning sign that wastewater may be escaping from the system.
2. Paper Towel Moisture Test
To check for indoor septic pipe leaks, place a dry paper towel around the joints and connections of any exposed pipes.
Leave it there for a while, then return to see if the towel has absorbed any moisture. If it’s damp, that likely indicates a leak at that connection point.
3. Dye Testing
A dye test is a simple way to trace septic leaks. A non-toxic, colored dye is flushed into the system through a toilet or drain.
After running water to move the dye through the pipes, observe the yard for any signs of the dye surfacing. Its appearance outside indicates a leak in the system.
4. Camera Inspection
For a more thorough check, professional plumbers use waterproof CCTV drain cameras to inspect the inside of pipes.
This allows them to detect cracks, clogs, or root intrusions without excavation. It makes a precise and minimally invasive method.
5. Septic Tank Level Monitoring
To check for leaks in the septic tank itself, first ensure the tank is at its usual liquid level. Then, avoid using any water in the home for 24 to 48 hours.
After this period, if the liquid level has noticeably dropped, it may signal a leak in the tank.
Prevention Tips: Keep Your Septic Pipe from Leaking Again
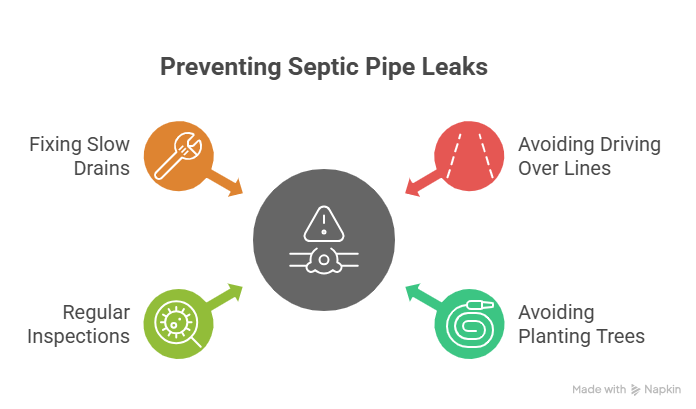
These proven prevention tips can help protect your septic system for years to come.
1. Don’t Drive or Park Over Septic Lines
Heavy vehicles (cars, trucks, machinery) compress soil and can crack or crush buried septic pipes. Mark your septic line path and tank location clearly to avoid accidental traffic.
2. Avoid Planting Trees Near the Septic System
Tree and shrub roots aggressively seek moisture, often infiltrating and damaging pipes.
Keep large-rooted trees like willows, maples, and oaks at least 25 – 50 feet from your septic components.
3. Schedule Regular Septic System Inspections (Every 3 – 5 Years)
Routine maintenance is crucial in preventing costly septic system leaks. Regular inspections help catch small issues before they escalate.
During maintenance, experts assess sludge levels, inspect pipe joints for damage, and check if the drainfield is properly absorbing wastewater.
4. Fix Slow Drains Before They Become Blockages
Clogs in your septic system build up pressure, which can weaken pipe joints and eventually cause leaks.
Watch out for early warning signs, such as gurgling sounds, standing water in sinks or showers, and unpleasant odors near drains.
If you notice slow drainage, it’s best to call for professional cleaning. Avoid chemical drain cleaners, as they can damage the essential bacteria your septic system relies on.
FAQs
1. How long do septic pipes last?
Septic pipes typically last 25 to 40 years, depending on the material (PVC, ABS, clay, or cast iron), soil conditions, and maintenance. PVC and ABS pipes are most common today and offer excellent longevity, especially if protected from root intrusion and physical damage.
2. Can you use Flex Seal or epoxy on septic pipes?
Yes, temporarily. Products like Flex Seal, epoxy putty, or rubber tape can be quick DIY patches for minor surface leaks. However, they’re not long-term fixes. Permanent repairs require replacing damaged pipe sections or sealing joints with pipe cement, ABS glue, or hydraulic cement.
3. How do I find a buried leaking pipe?
Check for soggy spots, sewage odors, or unusually lush grass. Try a dye or tissue test at pipe joints. For accurate leak detection, use sewer cameras or hire a septic pro with specialized tools.
4. Should I replace or repair a leaking pipe?
It depends on the leak’s severity, location, and the pipe’s age. Minor joint issues can be fixed with quick solutions like couplings or sealants. But cracked or collapsed sections usually need full replacement. If your system is 30 – 40+ years old, replacing the pipes might be more cost-effective long-term.
5. What does a septic leak smell like?
A septic leak often smells like rotten eggs (from hydrogen sulfide gas) or raw sewage. You’ll usually notice it near the tank, in your bathroom or basement, or around soggy spots in the yard. Persistent odor is usually the first warning of a hidden leak, so don’t ignore it.
Wrap Up
Know if your septic tank is leaking by checking for soggy soil, foul odors, unusually fast grass growth near the tank, or backed-up plumbing.
Leaks often create wet spots or sewage smells above the drain field. Monitor your water usage and schedule inspections every 3 – 5 years to detect issues early.
Use the tips in this guide to inspect your system, watch for warning signs, and apply minor fixes where safe. However, for persistent issues, a professional septic tank leak repair is often the best long-term solution.
However, when in doubt, call a licensed septic professional. They have the tools and expertise to fix the problem right the first time.
Flush smart, live clean!